WEB BUTTONS HOW TO'S
 How To's
 Round Drop Down Menu Html
- Slide Down Menu Css
- Html States Drop Down Menu
- Javascript Menu Cascade
- Unobtrusive Collapsible Menu Script Javascript
- Javascript Hover Menu Tutorial
- How To Create Submenu By Javascript
- Horizontal Menu Script
- State Drop Down Menu
- Css Html Forms Drop Down Menu
- Java Foldout Menu
- Collapsible Div Menu
- Jquery Transparent Dropdown Menu
- Drop Down Menu Html For Frontpage
- Css Menu Foldout
- Mouse Over Horizontal Drop Down Menu
 Features
 Online Help
  FAQ
FAQ


QUICK HELP
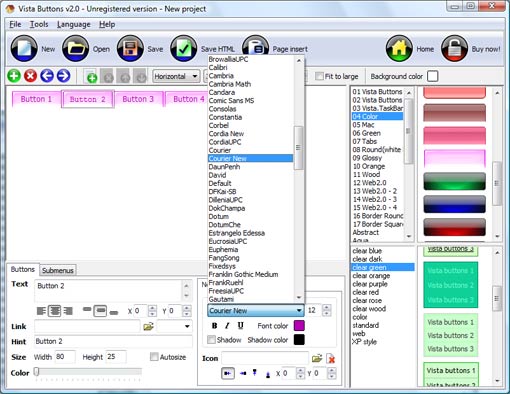
Adjust appearance of the menu.
SPRY HORIZONTAL SUBMENU DREAMWEAVER
Web buttons and icons properties Text - type the submenu's item text here. If you leave the field clean then the linked page will be opened in the same browser window.
This toolbox is for adjusting submenus properties. When you change submenu properties all submenus in the menu will be changed.
Link - the link that is to be opened when user clicks the item. For example: http://www.vista-buttons.com. You can also click "Open" icon to the left of the "Link" field to select the page you want to link to.
Link target attribute - link behavior adjustment. Link target attribute tells web-browser where to open the linked page. This attribute represents the Target attribute of the link (<a> tag in HTML). You can either enter your target value in the field or choose from the predefined attribute values in the list.
If you enter your own value, it must be a window or a frame name. Note, that names are case-sensitive. The linked document will then be opened in that window/frame.
Predefined attribute values:
Hint - specifies the tooltip that is shown when you hold the mouse over the item for a few seconds.
Padding parameters - If you want to specify padding around the whole submenu you should set Padding parameter. If you want to specify padding around submenu items you should set Items padding parameter.
Border width - Set Border width parameter if you want to specify border around the whole submenu. If you want to specify border width around each submenu's item you should set Items border width parameter.
Border color - set border color around the whole submenu.
Background color - set background for the whole submenu.
DESCRIPTION
Fully Customizable Css Hide Submenu Mouseover Javascript
Easy, quick, professional Cambiar Estilo De Un Select Html Its very easy to create professional high-quality web buttons with the help of Drop Down HTML Menu. Once installed you�ll be making buttons for your web site with no programming or drawing required. Css Navigation Side Menu Spry Horizontal Submenu Dreamweaver Instant preview
RELATED
MENU SAMPLES
Vista Style 7 - Homepage ButtonsTabs Style 6 - Buttons Design
Dynamique Scroller XP Style Blue - Button Image
Vista Style 1 - Buttons for Web
Vista Style 8 - Menu Buttons
Tabs Style 4 - Icons Buttons
XP Style Olive - Image Button
Dreamweaver Flyover Menu Buttons
Tabs Style 7 - Button Menu
SELECTED SAMPLE