WEB BUTTONS HOW TO'S
 How To's
 Cascading Menu Css
- Creating A Html Menu Bar
- Js Right Click Menu
- Javascript Sliding Menus
- Drop Down Menu Submenu Html
- Create Menu Bar Submenu Html Photoshop
- Css Menu Mouseover
- Html Menus Tutorial
- Css Vertical Drop Down Menu Scripts
- Free Dropdown Menus
- Drop Down Menu Html For Frontpage
- Css Menu Bar Sample
- Animated Html Menus
- Html Tutorial Menu
- Dynamic Floating Menu
- Java Create Right Click Menu
 Features
 Online Help
  FAQ
FAQ


QUICK HELP
Save your menu.
JAVASCRIPT NAVIGATION BAR MENU SOURCE CODE

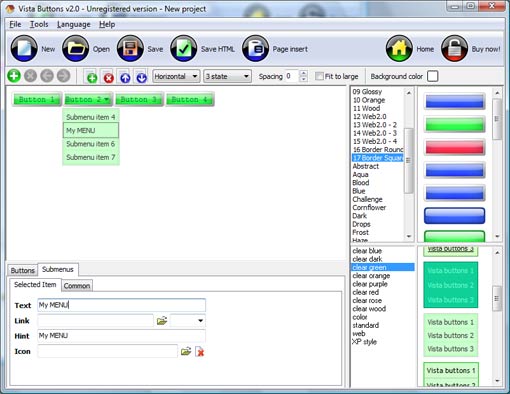
Then select next item in the submenu with click. Enter its text and so on. After finishing, the menu will look like this: 

When you find a submenu background you like, double-click it to apply. For example, after choosing one of the "blue" theme's backgrounds, we'll get following results:
DESCRIPTION
Total control of all menu parameters Css Sliding Image Menu
High Quality and Professional Results Como Hacer Scroll Con Java Script
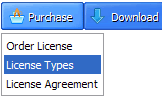
Drop Down Navigation Bar Javascript Navigation Bar Menu Source Code Not just buttons Drop Down HTML Menu is able to create not just separate images of buttons, but also complete web menus. These menus can be either horizontal or vertical, they support �rollover� and �click� effects with full set of javascript and html code.
RELATED
MENU SAMPLES
Tabs Style 7 - Button MenuCommon Style 1 - CSS Button
Custom Menu Script Download Tabs Style 8 - Web Site Graphics
Tabs Style 3 - Buttons Images
Tabs Style 1 - Buttons gifs
Common Style 2 - Navigation Buttons
Common Style 3 - Web Page Button
Create Menu Css Html
Vista Style 6 - Buttons Graphics
SELECTED SAMPLE