WEB BUTTONS HOW TO'S
 How To's
 Html Tab Menu Bar
- Create An Expandable Menu
- Javascript Collapsible Menu Tutorial
- Sample Free Horizondal Dropdown Menu Javascript
- Dropdown Menu Bar Html
- Collapsible Menu Flash Tutorial
- Html Codes For Dropdown Menu
- How To Create Submenu In Css
- Html Horizontal Dropdown Menu
- Drop Down Menu Without Java
- Blogger Template Drop Down Menubar
- Collapsible Menu Icons
- Bash Menu Program
- Dhtml Drop Down Menu Submenu
- Horizontal Menu Html
- Horizontal Scrolling Menu Javascript
 Features
 Online Help
  FAQ
FAQ


QUICK HELP
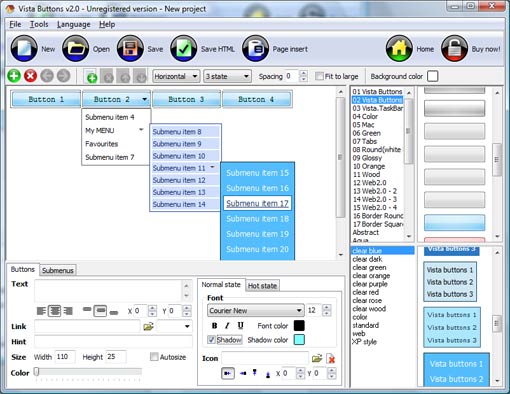
VISTA STYLE DROP DOWN MENU
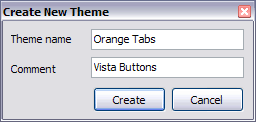
To add this button style to the Themes toolbox, click "File/Theme editor" in the main menu. Create buttons in theme editor. Theme with the entered name will be created and set as current theme in the Theme editor.
Click "New theme" button to create animated buttons in the Themes toolbox. Enter new theme name and special notices and click "Create".
DESCRIPTION
3-state rollover buttons Dynamic Menu Use Xml
Easy, quick, professional Drop Down Menu On Mouse Over Html Script Its very easy to create professional high-quality web buttons with the help of Drop Down HTML Menu. Once installed you�ll be making buttons for your web site with no programming or drawing required. Css Graphic Tab Navigation Vista Style Drop Down Menu Adjusting menu appearance
RELATED
MENU SAMPLES
Tabs Style 6 - Buttons DesignTabs Style 1 - Buttons gifs
Como Son Submenus De Java Tabs Style 2 - Web Buttons
XP Style Blue - Button Image
Common Style 4 - Html Button
Tabs Style 7 - Button Menu
Tabs Style 8 - Web Site Graphics
Creating Flyout Menu With Images
Common Style 3 - Web Page Button