WEB BUTTONS HOW TO'S
 How To's
 Coding For Submenu Creation Using Javascript
- Tab Menu In Html
- Flyout Menu In Frontpage
- Linux Bash Menu
- Simple Menu In C
- Dhtml Dynamic Menu Bar Example Iframe
- Css Pulldown Menu
- Css Vertical Menu Flyout Tutorial
- Create Dynamic Html Menus
- Webpage Drop Menus
- Auto Collapsible Popup Menu
- Foldout Menu Css
- Html Codes Menu Bar
- Html Menu Tutorial
- Hover Menu
- Menu Navigation Html
 Features
 Online Help
  FAQ
FAQ


QUICK HELP
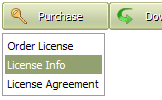
DROP DOWN MENU TUTORIAL
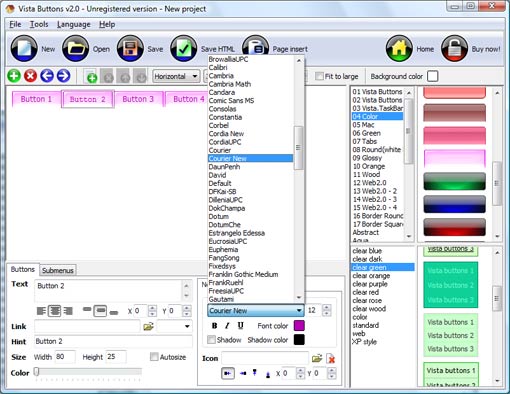
Button Themes Toolbox
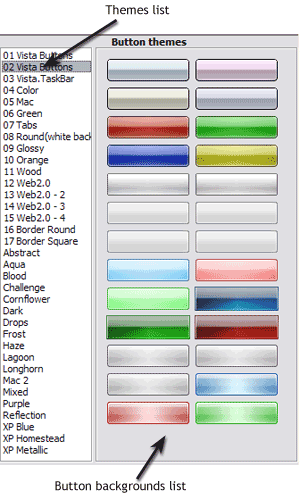
In the Themes toolbox you can choose selected buttons for web appearance. Click theme name to open it. The theme's available button backgrounds will appear in the Button backgrounds list.
You can check how a background responds to the mouse events without applying it. To do so just move mouse over/click the background.
To apply chosen background, just double-click it. Selected buttons' appearance will change.
DESCRIPTION
Not just buttons Disable Select Menu Javascript Dropdown DHTML Menu is able to create not just separate images of buttons, but also complete web menus. These menus can be either horizontal or vertical, they support �rollover� and �click� effects with full set of javascript and html code. Professional Look-n-feel Ejemplo En Javascript
Css Fixed Position Drop Down Menu Tutorial Easy, quick, professional Its very easy to create professional high-quality web buttons with the help of Dropdown DHTML Menu. Once installed you�ll be making buttons for your web site with no programming or drawing required.
RELATED
MENU SAMPLES
Vista Style 7 - Homepage ButtonsTabs Style 8 - Web Site Graphics
Cost To Vertical Menu Samples Using Javascript Common Style 3 - Web Page Button
Vista Style 5 - Animated Buttons
Tabs Style 6 - Buttons Design
Common Style 4 - Html Button
Vista Style 8 - Menu Buttons
Javascript Collapse Menu
Tabs Style 4 - Icons Buttons
SELECTED SAMPLE