WEB BUTTONS HOW TO'S
 How To's
 Dropdown Menue For Html
- How To Create Submenu Using Javascript
- Drop Menu Using Javascript
- Html Fold Menu
- Html Drop Down Link Menu
- Javascript Submenu Button
- Html Dropdown Menu Template
- Creating Menu For C Program
- Round Drop Down Menu Html
- Collapsible Menu Jquery
- Html Horizontal Menu Bar
- How To Create A Tree Menu
- Creating Submenu In Html
- Html Collapsible Menu
- Css Mouseover Menu Using Images
- Blogger Template Drop Down Menubar
 Features
 Online Help
  FAQ
FAQ


QUICK HELP
CSS VERTICAL COLLAPSING MENU
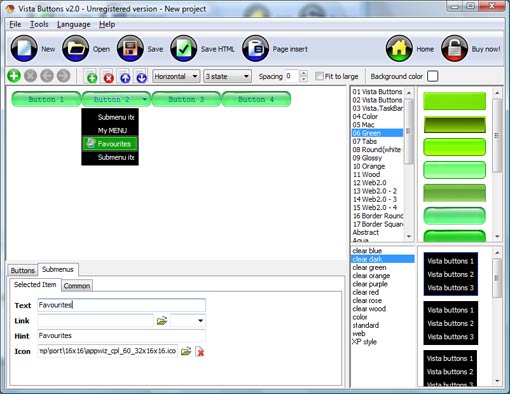
Properties of play button Text alignment - defines text alignment inside the button. Text offset - text offset in relative coordinates. For more precise text position adjustment. If you leave the field clean then the linked page will be opened in the same browser window. Color - move slider to change selected buttons' colors.
This toolbox is for adjusting the buttons' properties. You can adjust one single button or a group of web page buttons selected with Ctrl/Shift keys at once.
 Text - type the button text here. If you want the button to have several lines of text just press "Enter" after typing each line.
Link - the link that is to be opened when user clicks the button. For example: http://www.vista-buttons.com. You can also click "Open" icon to the left of the "Link" field to select the page you want to link to.
Link target attribute - link behavior adjustment. Link target attribute tells web-browser where to open the linked page. This attribute represents the Target attribute of the link (<a> tag in HTML). You can either enter your target value in the field or choose from the predefined attribute values in the list.
If you enter your own value, it must be a window or a frame name. Note, that names are case-sensitive. The linked document will then be opened in that window/frame.
Predefined attribute values:
Hint - specifies the tooltip that is shown when you hold the mouse over the button for a few seconds.
Autosize - defines whether the button size is set automatically to accommodate all its contents or not. If not, you should enter the button size manually in the "Width" and "Height" fields.
Width, Height - if "Autosize" property is off then you can enter the button size in these fields.
Pressed - this property is disabled unless your menu type is "3-state toggle". If the menu type is "3-state toggle" and the property is set then the button will be displayed as pressed. Note, that only one button in the menu can be "pressed" at a time.
In the example below, the "Download" web page buttons Pressed property is set.

DESCRIPTION
Easy to Use Download Win Os X Taskbar
Extended capabilities to save and export the results Animaciones Con Onmouseover En Javascript
Css Tabs Shadows Css Vertical Collapsing Menu Professional Look-n-feel
RELATED
MENU SAMPLES
Vista Style 8 - Menu ButtonsTabs Style 7 - Button Menu
Drop Down Javascript Dependientes Vista Style 10 - Button Graphics
Common Style 3 - Web Page Button
Tabs Style 8 - Web Site Graphics
Vista Style 9 - Toolbar Buttons
XP Style Blue - Button Image
Bash Creating A Menu
XP Style Olive - Image Button
SELECTED SAMPLE
HOW TO's
Html Vertical Drop Down Menu
Vertical Submenu In Javascript
Collapsible Menu Css Vertical
How To Make Submenu In Java
How To Create Submenu By Javascript
Simple Mouseover Menu Css
Collapsible Menu Using Javascript And Css
Collapsible Flash Menu
Collapsible Css Tree Menu
Expandable Vertical Menu