WEB BUTTONS HOW TO'S
 How To's
 How To Create Cross Frame Menu
- Menu Drag And Drop Online
- Jquery Menu Vmenu
- Foldout Menu Vertical
- Horizontal Drop Down Menu Bar
- Create Html Collapsible Navigation Menu
- Html Drop Down Menu Generator
- Html Menu Drop Template
- Menubar Html
- Bash Creating Menus
- Create Html Dropdown Menu
- Html Navagational Menus
- Html Submenu
- Create A Menu In Bash
- Cascade Menu Html
- Horizontal Submenu Script
 Features
 Online Help
  FAQ
FAQ


QUICK HELP
Save your menu.
HTML CODE FOR DROP DOWN MENU
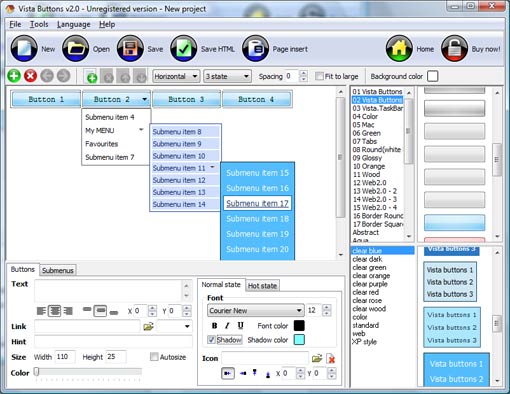
To create your own theme, you should create the button image states first. It contains button image for each Normal/Hot state of the button, one-by-one, vertically. Button image states is a .bmp file like this one. Each button image state must have the same height. In the example below the button states image has size 50x150. It contains three button state images, 50x50 each.

DESCRIPTION
Not just buttons Decoración De Folders Dropdown DHTML Menu is able to create not just separate images of buttons, but also complete web menus. These menus can be either horizontal or vertical, they support �rollover� and �click� effects with full set of javascript and html code. 3-state rollover buttons Dynamic Html Dhtml Navi
Drop Down Menu Over Image Fade Script Html Code For Drop Down Menu Vista-style menus Web menus, which are created by DHTML Dropdown Menu, exactly correspond with Windows Vista graphic interface components. That is why the visitors of your site will not have to spend their time in order to familiarize with the unusually-looking navigation. Nevertheless, you are not limited by the standard Windows themes, and you will be able to create your own original buttons.
RELATED
MENU SAMPLES
Vista Style 7 - Homepage ButtonsVista Style 8 - Menu Buttons
Download Menu Mac Para Win Xp Vista Style 5 - Animated Buttons
Tabs Style 6 - Buttons Design
Common Style 1 - CSS Button
Common Style 2 - Navigation Buttons
Vista Style 10 - Button Graphics
Oracle Xe Jquery Menu
XP Style Metallic - Web Design Graphics
SELECTED SAMPLE