WEB BUTTONS HOW TO'S
 How To's
 One Button Drop Down Menu
- Generator Css Tree Menu
- Bash Menu Maker
- Html Menu With Submenu
- Nice Css Menu Horizontal
- Joomla Fold Menu
- Javascript Submenu Tutorial
- Javascript Dropdown Submenu
- Tab Menu Slide Css Mac
- Horizontal Html Menus
- Drop Down Menu Html Ready
- Collapse Menu
- Bash Menu Howto
- Create Menu Submenu Using Javascript
- Collapsible Menu In Dojo
- Bash Menu Submenu
 Features
 Online Help
  FAQ
FAQ


QUICK HELP
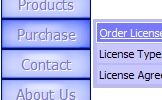
CREATE MENU BAR
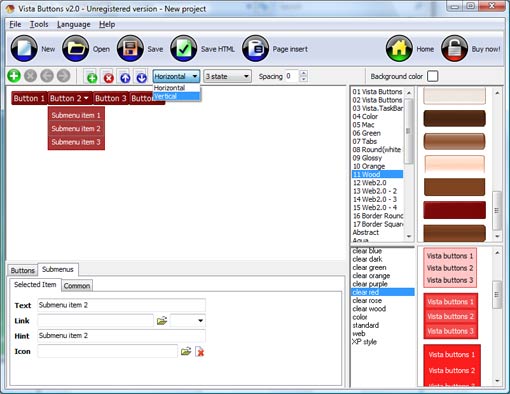
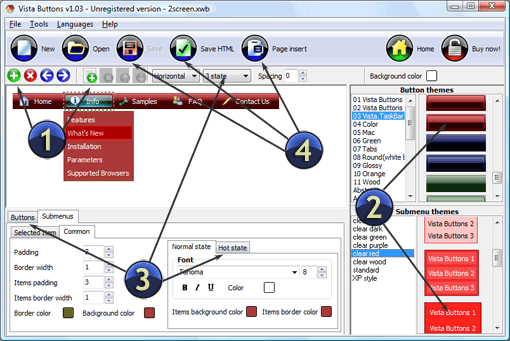
Cascade graphics user guide Main window Toolboxes:
1. Main menu
2. Toolbar
3. Work area
4. Themes toolbox
5. Submenu toolbox
6. Properties toolbox - main buttons
7. Properties toolbox - submenus
DESCRIPTION
Good navigation system is an important part of web site success. If people can't find their way around the site, they will rapidly give up looking and go, never to return. So, it's very significant that your website has a neat, fast, and
Don't permit your web site visitors to get lost. Try Drop Down DHTML Menu!
Total control of all menu parameters Cascada
Professional Look-n-feel Css Form Dropdown
Dhtml Blättern Create Menu Bar Seamless Integration
RELATED
Access 2007 Custom Menu Bars - Microsoft Access / VBA answers > easily create custom menu bars. Do we really want to be forced to > write XML code to create a custom menubar? Is this making things > easier for the end user?
Free Menu Bars Create your own free menu bars or use the one already created. The menubars are free to download and place on your own web pages
Creating Menu Bar in a Form - Microsoft Access / VBA answers Creating Menu Bar in a Form. Ask Microsoft Access / VBA questions and get answers from our community of Microsoft Access / VBA experts and professionals on BYTES.
Cocktail Menu Templates Bar Menu Templates Cocktail Menu CREATE MENU; CREATE TABLETALKER; COCKTAIL RECIPES; BECOME A MEMBER; myACCOUNT New Engagement / Wedding Menu Designs Included in the new subscription
Bar Menu, Bar Menu Template, Bar Menu Design - MustHaveMenus menus help you celebrate and promote happy hours, cocktail menus, holiday drinks, drinks for special events, and much more. A fun, enticing bar menu template can create a
Free Menu Bars Create your own free menu bars or use the one already created. The menubars are free to download and place on your own web pages
Create Office menu bar, command bar with custom controls. VB .NET components for creating a COM add-in / plug-in in VB.NET, C#, C++. Add any controls: buttons, pop-ups, menu iems to Microsoft Office toolbar / commandbar and
How to Create Menu Bar in Wordpress Blogs | How to Guide Generally wordpress based blogs dont have a menu bar in the top section/header part and consists of generally a web blog logo, search box and a ad section but
Creating Simple CSS Menu Bar � Easy Way To Create A Simple And Easy Css Menubar. Easy Step 1:open note pad or dream weaver or any editorial you have. if you are using editorials then copy and past this
Free CSS Navigation Menus in Blogger. ~ The Blog Doctor. For example, let say i wanted to post multiple song lyrics in the "Song & Lyrics" navi menu bar how do i create that to be link to this section?
Making a Rollover Menu Bar You should now be able to take these techniques and create wonderful menu bars for your own websites! If this tutorial has helped you make a groovy menu, please tell us
Javascript Menu Bars Create I want to use your menu to create a javascript menu bars like effect in my application.
Cocktail Menu Templates Bar Menu Templates Cocktail Menu CREATE MENU; CREATE TABLETALKER; COCKTAIL RECIPES; BECOME A MEMBER; myACCOUNT New Engagement / Wedding Menu Designs Included in the new subscription
Download How To Create Horizontal Menu Bar In Flex Source How To Create Horizontal Menu Bar In Flex Codes and Scripts Downloads Free. Searchbliss: Menu Bar Generator is multi-platform compatible. Menu-Bar is a javascript
Create a Navigation Menu Bar. ~ Tips for Bloggers Tips for Bloggers for easy blogging and Making Money.
Free CSS Navigation Menus in Blogger. ~ The Blog Doctor. For example, let say i wanted to post multiple song lyrics in the "Song & Lyrics" navi menu bar how do i create that to be link to this section?
jQuery Drop Down Menu, Web Buttons, Animated jQuery Menu A collection of highly configurable java applets that allows you to create cross-browser drop down menus, bars, and buttons. DBFView is a compact but powerful tool
Cocktail Menu Templates Bar Menu Templates Cocktail Menu CREATE MENU; CREATE TABLETALKER; COCKTAIL RECIPES; BECOME A MEMBER; myACCOUNT New Engagement / Wedding Menu Designs Included in the new subscription
Dreamweaver MX Tutorial: How to create a link menu or How to Create a Link Menu or Navigation Bar in Dreamweaver MX (To replay an earlier portion of the tutorial without starting over, simply drag back the progress bar arrow
Menus In Excel97 And 2000 These procedures will not work for creating menu items on tool bars in the Visual Basic Editor. For information about working with menus in the VBE, click here.
Making a Rollover Menu Bar You should now be able to take these techniques and create wonderful menu bars for your own websites! If this tutorial has helped you make a groovy menu, please tell us
Dreamweaver MX Tutorial: How to create a link menu or How to Create a Link Menu or Navigation Bar in Dreamweaver MX (To replay an earlier portion of the tutorial without starting over, simply drag back the progress bar arrow
Create cocktail menu - Design your own cocktail menu in minutes Unlock these features with full subscription: Access all menu backgrounds; Access all TableTalker backgrounds; Save your menus and TableTalkers; Upload your venue logo
Free CSS Navigation Menu Bar Buttons Wizard Design and create customized CSS navigation menu bar buttons for your website the easy way, free, with this wizard.
Image Menu Bars Create horizontal rollover navigation menu bar in Dreamweaver made easy.
jQuery Drop Down Menu, Web Buttons, Animated jQuery Menu A collection of highly configurable java applets that allows you to create cross-browser drop down menus, bars, and buttons. DBFView is a compact but powerful tool
YouTube - How to create Spry Menu bar in dreamweaver How to create Menu bar or navigation bar in dreamweaver cs4
Free CSS Navigation Menus in Blogger. ~ The Blog Doctor. For example, let say i wanted to post multiple song lyrics in the "Song & Lyrics" navi menu bar how do i create that to be link to this section?
Creating an Internet Explorer-style Menu Bar (Windows) At first glance, the menu bar in Internet Explorer version 5 and later looks similar to a standard menu.
jQuery Drop Down Menu, Web Buttons, Animated jQuery Menu A collection of highly configurable java applets that allows you to create cross-browser drop down menus, bars, and buttons. DBFView is a compact but powerful tool
MENU SAMPLES
XP Style Olive - Image ButtonVista Style 5 - Animated Buttons
Css Menue Rollover Dropdown Vista Style 7 - Homepage Buttons
Tabs Style 8 - Web Site Graphics
Vista Style 6 - Buttons Graphics
Tabs Style 1 - Buttons gifs
Common Style 3 - Web Page Button
Coding For Creating Submenu Using Javascript
XP Style Metallic - Web Design Graphics
SELECTED SAMPLE